Formatting a Word Document
I. Views allows the user to see the document in several different ways.
A. Normal View shows basic document text. Default view
1. In Normal View, the user can see on the screen:
a) font formatting
b) paragraph formatting
2. In Normal View, the user cannot see on the screen:
a) page formatting
b) headers and footers
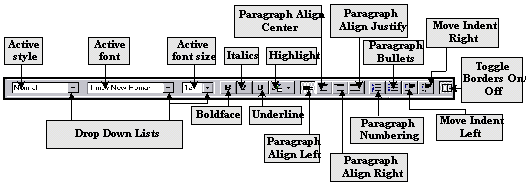
Figure 1: The Format Toolbar
II. Character formatting changes the look of the text.
A. Fonts are the typefaces used in a document.
B. Select text to be formatted or make formatting selections or before you type.
C. Use Format | Font | Font tab to display the Font dialog box.
1. Change typestyle
a) TT after a font name signifies the font is a True Type font.
b) True Type will look the same on the computer monitor screen as it will when printed.
2. Type size
a) size is measured in points
b)
a point is  of an inch
3. Regular | Boldface | Italics | Bold Italic
a) Keyboard shortcut Þ Bold: Ctrl + B
b) Keyboard shortcut Þ Italic: Ctrl + I
4. Underline
a) none will turn off underline
b) single will underline all selected text including spaces.
c) words only will not underline only words, not spaces.
d) double will double underline selected text
e) dotted will return a dash underline.
5. Color will change the color of text
6. Effects menu will add:
a)
Strikethrough will
place line through selected text.
b) Superscript will compress and raise selected text.
c) Subscript will compress and lower selected text.
d) Hidden will display but not print selected text.
e) Small Caps will print selected text in caps the size of lower case letters.
f) All Caps will print all selected text Upper case letters.
D.
Use Format | Font | Character Spacing tab to display the Character Spacing of Font dialog box.
1.
Spacing expands or compresses the spaces between letters in a word.
a)
uses points as
its measuring system
2.
Position raises or lowers selected text relative to the line.
3.
Kerning adjusts
spaces between characters to smooth the appearance of text.
III.
Paragraph
formatting changes the positioning of text in the document.
A.
Use Format | Paragraph | Indent and Spacing tab to display the
dialog box
B.
Indentation moves text in from the left or right margin.
1.
Set in inches
C.
Special creates specific kinds of
indents.
1.
First Line indentation indents only the first line of a paragraph.
2.
Hanging Indent moves text after the first line in from the
left. It creates an indent for all
succeeding lines.
D.
Line spacing is measured in font point size.
1.
One point equals  ”.
”.
2.
The larger the
text’s font point size, the larger is the line spacing
a)
10 point text
font uses a 12 point line
b)
12 point text
font uses a 14 point line
c)
24 point text
font uses a 27 point line
3.
To set line
spacing place insertion point in the paragraph you wish to format and select
desired line spacing.
4.
Regular line spacing
formats are:
a)
Single is the Word default; one line space
b)
1.5 Þ 1 and  lines spacing
c)
Double Þ two lines spacing
5.
Special line
spacing formats are:
a)
At least | At box allows for larger
font sizes than what are normal for the line.
b)
Exactly | At box allows user to select specific line spacing.
c)
Multiple | At box decreases or increases line spacing
by a percentage Þ 1.2 > spacing by 20% / .8 reduces line spacing by
20%
6. Keyboard shortcuts:
a) Ctrl +1 Þ Single Space
b) Ctrl +2 Þ Double space
c) Ctrl +5 Þ one and one half line spacing
E. Before and After adds spacing before or after the paragraph.
F. Alignment makes text flush left, centered, flush right, justified (flush left and right).
IV. Format | Tabs allows user to set tab stops.
A. Use tab stops to indent or to perfectly align text.
1. The default is 0.5”.
B. Set tabs in inches from the left margin.
C. The ruler displays tab alignment.
1. Left aligns text to the right of the tab.
2. Center aligns text centered to the tab stop.
3. Right aligns text to the left of the tab stop.
4. Decimal aligns text centered to a decimal point.
5. Bar creates a horizontal line centered to the tab stop.
D. Leader creates special characters that lead to the tab.
V. File | Page Setup is used to set page formatting.
A. When using Page Setup, first determine if the changes are to affect :
1. Whole Document: all the pages and sections of the document
2. This point forward: all succeeding text.
3. This section: only selected section of document.
B. Margins are set in inches.
1. How small the margin can be is determined by the printer to be used to print the document.
a) Laser printers count lines different than do inkjets; therefore inkjets require a larger bottom margin.
2. Gutter changes margin space between two facing pages within the documents.
a) adds extra left and right margins accordingly.
3. From Edge changes the distance of a header or footer from the paper’s physical edge.
a) inkjet printers require a more space at the bottom for footers to print.
4. Mirror margins balances margins for left/right facing pages.
C. Paper size selects landscape or portrait orientation.
1. Portrait on standard letterhead 8½” wide x 11” high.
2. Landscape on standard letterhead 11” wide x 8½” high.
D. Layout tab effects changes to the design of a document.
1. Section Start changes how a section break will affect in a document.
2. Headers and Footers affects how these enhancements will print on a page.
a) different for odd, even, or first page.
3. Vertical alignment controls position of text relative to the top margin setting of the page.
a) top places text at the top of page margin
b) center places text at the center of page margins.
c) justified places equal spaces between paragraphs in the document.
VI. The Ruler can set and display most character, paragraph, and page alignments.
A. Ruler measures in inches.
B. Margins are in gray area of the ruler. Printable area is in white area of the ruler.
1. To set margins, click and drag the gray area ruler horizontally for left/right margins and vertically for top/bottom margins.
2. Double click on ruler to display the Page Setup dialog box.
C. Tabs are set by pointing on the area of the bottom of the horizontal ruler bar clicking once.
1. Click and hold to display dashed line to show vertically align of text relative to that space on the ruler.
2. Double click on the bottom of the horizontal ruler to display the Tab dialog box.
3. Indentation is set adjusting the markers at the left and right margins of the horizontal ruler.
a) left side is a 3 position switch
(i) top marker pointing down: sets paragraph indentation
(ii) middle marker pointing up: sets hanging indentation
(iii) bottom square marker: sets paragraph indentation and hanging indentation, or:
(iv) readjusts paragraph indentation and hanging indentation proportionally
VII. Edit | Find | Replace searches a Word Document for specified text
A. Find what | Type text to be found in the dialog box, or:
1. locate text in drop–down box
B. Type replacement text in Replace with dialog box
VIII. Tricks, Tips, and Shortcuts
A. Right Mouse button can access
1. Cut, Copy Paste
2. Font formatting
3. Paragraph formatting