
New Microsoft Snipping Tool
And New Snipping Tool Settings
At one time in Cyberdelic Culture, free meant exactly that. If a Consumer wanted to give some new widget a try, all that Consumer needed to do was download and install the widget. Nowadays, as we all know, trying out something new usually requires registering an email for subscribing to whatever, and even more drastic hoop hurdling to get through the signing up process. All the while, wondering with utter dread if the download will wipe out your system with malware. Why bother?
All that above illustrates what is so very cool about the Microsoft Snipping Tool. The Snipping Tool is one of the single, most useful software Widgets to come around in many years. At first, the Snipping Tool was a PowerToy exclusive. Later on, to get the newest version, a Consumer had to be enrolled in the Windows Insider Program, which is not very Consumer friendly. The Snipping Tool, is now integrated into Windows 11 and Windows 10. The newest iterations of Snipping Tool are, however, only compatible with Windows 11 version 22000.0 or higher. Now, The Gnomes of Redmond offer the newest Snipping Tool to all Windows 11 Users via the Microsoft Store. All you need is Windows 11 and a Microsoft account, which as a Consumer, you have because you have Windows 11.
If you are as much a Snipping fan as I am, and you have not visited the
Microsoft Store lately, then you might want to click on over there.
The latest general release is version Snipping Tool 11.2305.26.0.
There have been several behind the scenes changes to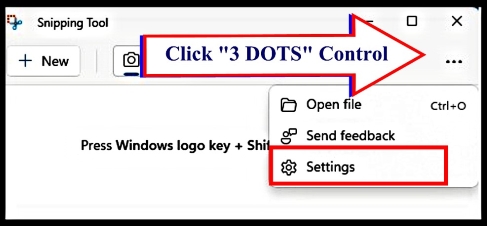 Snipping Tool that you may not be aware of. Some of these changes may
affect how you use Snipping Tool.
Snipping Tool that you may not be aware of. Some of these changes may
affect how you use Snipping Tool.
After you have installed the newest version of Snipping Tool, bring up the app, and click the "3 Dot Control" to open the Snipping Gear Icon and Settings Menu.
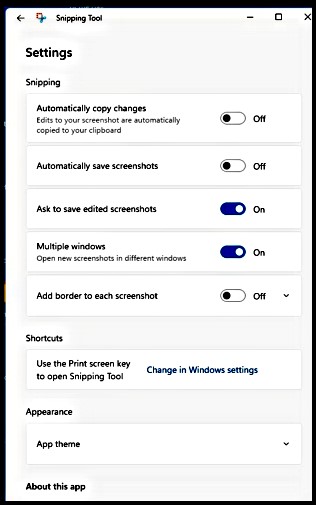
The Settings Menu itself is surprising long given the limited uses of the application. For our purposes here, we will look at each of the individual settings. There will be offer a short discussion of the what each Setting does. Finally, I will attempt to explain why I have chosen to turn on or turn off each item on the Settings Menu.
It should be noted that reasons why I have a feature turned on or off are based entirely on how I use the Snipping Tool. Mostly, I use the Snipping Tool to take elements from one image and place them within another. Almost all my Editorial Images, as I call them, are cut and paste montages. Here, the Snipping is invaluable.
Now you might think me quite a Cyber Stick In the Mud having so many features turned off. For me, these Settings are highly idiosyncratic. All I can do is explain Why I choose the Settings I did.
| The first item on the
Settings Menu is whether or not to automatically copy changes to the
Clipboard. I have this turned off because all these
seemingly little clips are, in fact, separate image files.
These little Snips can add up in total RAM usage pretty quick.
See the section below on
Clipboard History. Even though this feature is turned off, I found that if I call up a new instance of MS Paint, and then click paste, the Snip is there. So I am not the feature sure works as advertised. |
 |
| Next comes the question of whether or not to automatically save each Snip. I will often take several Snips before I save a Snip for posterity. I get finicky about border sizes. Sometimes I will se something in the original image I will want to change. I control what ultimately lands on my hard drive. I decide when to Save. |
 |
| More often than not, I only work with one Snip at a time. But whenever I am working simultaneously with multiple Snips, I want then to be displayed a separate image files, each in its own Windows. |
 |
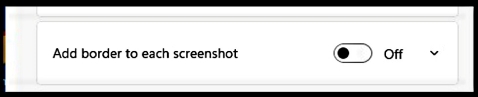
| If there is no image editing software application regularly use, then adding a border to your Snips might be a nice effect. Again, I prefer to make all these choices myself. I do good borders, I like to think. So I turn that feature off. |
 |
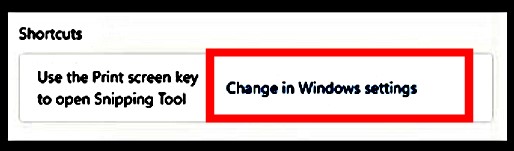
| To me, Print Screen is a
different function than is Snipping only a portion of the
screen. Sometimes I want the entire screen. When I
want to capture the entire screen, I do not want Snipping Tool
to start. I only want to hit the Print Screen button on
the KB. So I turned the feature off in Windows Settings. The path to toggle this feature on or off in Windows Settings is: Settings → Accessibility → Keyboard. |
 Windows Settings Screen 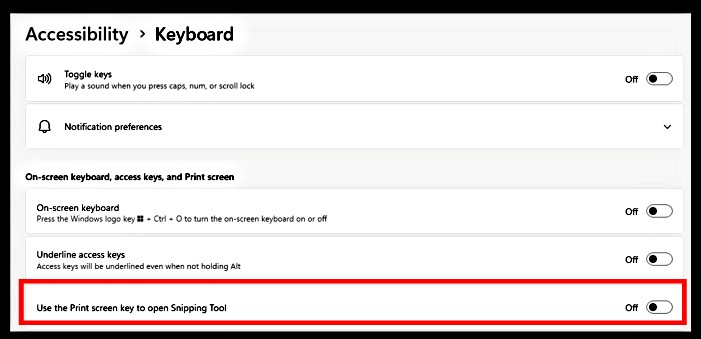 |
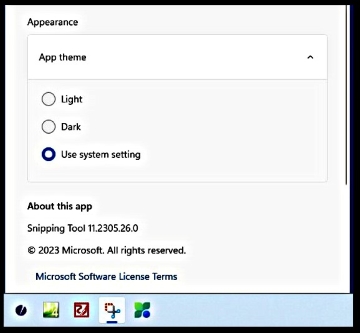
| Lastly, we have the now
ever ubiquitous "App Theme."
I find it somewhat amusing that young developers and software engineers, who have only known 1,000,000 plus color screens, want us all to return to the era of White Text on Black Screen Background. No thank, you, Young'uns. I like the Traditional Windows System Screen Color. But for those who do like the new fab color themes, Snipping Tool accommodates you, too. |
 |
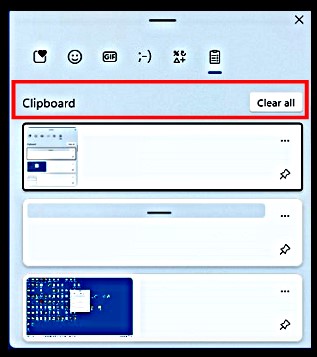
| A word on the
Clipboard
History feature. Again, this sounds very convenient, and
it might be so in may situations. All those separate Snips can start pile up in
memory, though. Too many Snips in memory quickly becomes
unmanageable. So use at your own risk. To clear the Clipboard memory, simply click the Clear button from within Windows Settings → System → Clipboard. After adjusting how you want to interact with you Clipboard, to toggle the Clipboard History view on or off, use the keyboard shortcut: Windows logo key + V. The list pops up like the second image on the right. The KB shortcut will also give you the option to clear the Clipboard History list. Those readers who use "Windows + . or ;" to use the Emoji Menu, will notice that "Windows key + V" brings up the same menu as "Windows key + ;". |
  |
| There's A Whole Lot of Settings going on here. Mastering the Settings is part of Mastery of the Application itself. | |
Gerald Reiff