

From BitLocker to BitchLocker:
Defensive Computing in the Age
of Rampant Ransomware
A Reprise

In Season 5 of Buffy the Vampire Slayer, a new villain was introduced: Glorificus (aka “Glory”), an evil goddess who came to Earth in search of her lost key. Before wreaking havoc on Sunnydale, Glory would rage, “Where’s my key?” — a demand that baffled the Scooby Gang, who had no idea what key she was talking about. Today, Windows users face a similar mystery. Like Glory demanding her mystical key, BitLocker now demands a recovery key. And like the fictional good people of Sunnydale, many users have no idea what it is, where it came from, or how to retrieve it.
Glory demanded her Key. Windows does too. But unlike Glory, BitLocker doesn’t rage — it just locks you out. Twice in 2025, after a Windows update, some Windows users were faced with a demand for a recovery Key to start the PC up. When BitLocker demands a 48-digit code before startup, it’s not asking politely — it’s enforcing encryption. If you don’t have the key, your data stays locked. This Dispatch walks you through how to find it, save it, and avoid future headaches.
I use the example of Glory to illustrate how a Windows user might feel, if, after the October 2025 updates, users experience what is shown below when attempting to start their computers. Before Windows starts, those users are confronted with an unfamiliar screen demanding, like the fictional villain goddess, a key those users may have no idea they ever created — or even knew existed. Like Glory demanding her mystical Key, Windows now demands a recovery key — except users often have no idea what it is, where it came from, or how to retrieve it.

On May 15, 2025, I posted a two-part Dispatches about Drive Encryption (Part 1) and Microsoft BitLocker (Part 2). At that time, the May 2025 monthly updates caused some PCs to not boot properly and caused some Windows users to be confronted with BitLocker screens at startup. In some cases, simply powering the PC on off and on (maybe more than once) would reset Windows and the affected PC would then startup correctly. Others weren’t so fortunate. Without their recovery key, they were locked out entirely. A clean reinstallation of Windows was required, and any data not backed up was then lost.
This is important again now because the October 2025 monthly Windows updates are causing the same error at startup as had happened in May. Windows is demanding the drive recovery key before startup. After the October 25 updates, a hardware feature called Modern Standby disrupted the expected boot sequence, causing BitLocker to interpret the change as tampering. To disable Modern Standby requires a Windows Registry edit, which I do not advise most users perform. Any mistake might render the PC unusable requiring a clean reinstallation of Windows.
In Windows 11, BitLocker drive encryption is turned on by default. BitLocker can, however, be easily disabled. Whether or not disabling BitLocker is a good idea is debatable. The downside of having BitLocker enabled is that occasionally things go wrong, and a user can be locked out of their PC if he/she does not have the Recovery Key handy. On the other hand, the key benefits of having BitLocker turned on are clear, as shown below.
✓ Protection against
ransomware. BitLocker can help isolate encrypted data from malware
that targets unprotected volumes
✓ If your PC is lost or stolen, unencrypted data can be
accessed by anyone who gets their hands on it.
✓ Without encryption,
attackers can remove the drive and read its contents on another machine.
Part 1 of the series referenced above offers a detailed overview of drive encryption. Part 2 offered 2 tutorials that detailed instructions that will help users find their BitLocker Recovery Key from users' Microsoft.com Account. Part 2 also offered instructions on how to turn Drive Encryption on and off. Both Part 2 tutorials are reprised below.
How to Find Your Recovery Key
| Step one to retrieving your drive encryption key is knowing what are your Microsoft account credentials. Once you have your credentials in hand, and you have also successfully logged onto the Microsoft.com website, then to go to your Microsoft account. Click where you see your name. A small menu will appear like that shown at the right herein. Click the link to My Microsoft Account. When your Microsoft account page loads, notice the different sections in the middle of the account page. You want to focus on the Devices section. |
 |
| Before you can use
the Devices Page, you must know the name or names of your
computer(s). This computer name was set when the computer or
operating system was first setup. To find the computer
name, simply open Settings by clicking the gear icon
|
 |
| Now that you know the name of the computer that you want to locate and copy its encryption key, scroll down to the Devices section. Any computer that was setup using your Microsoft credentials will be listed here. I mention this because in many families, the same Microsoft account credentials are used for each family member. |
 |
| To retrieve the encryption key, click View details for either computer. When the details page opens, a few facts about that machine will be listed. For instance, the amount of memory installed is shown. To find your PC's recovery keys, click Manage recovery keys. If you no longer own this machine and would like to remove that old PC from your account, click Remove this device that is located in the top right corner of the screen. |
 |
| When you click Manage recovery keys, all available recovery keys will be displayed. In the two samples used here, one machine has an encrypted drive; the other machine is not encrypted. When the Manage recovery keys screen appears, as in my sample here, only the one encrypted drive is shown. I have redacted the Recovery key for my own security needs. |
 |
| To print and or store the recovery key, first open up a text editor like Word or Notepad. Then simply select the key with your mouse, right-click to copy, and right-click again to paste it into your text editor. |
How to Turn Off or Turn Back On BitLocker Drive Encryption in Windows 11 Professional.
Under most circumstances, I personably see no reason to remove drive encryption. That said, there are some good reasons to remove drive encryption. A few reasons are if you plan on using that drive on another system; or place the drive in a docking station; or transfer or recycle the PC. It is quite easy to remove the encryption from a Windows 11 home or Professional installation. Please, however, backup all your data files before you attempt to remove drive encryption. Also, have the encryption key handy just in case something goes wrong.
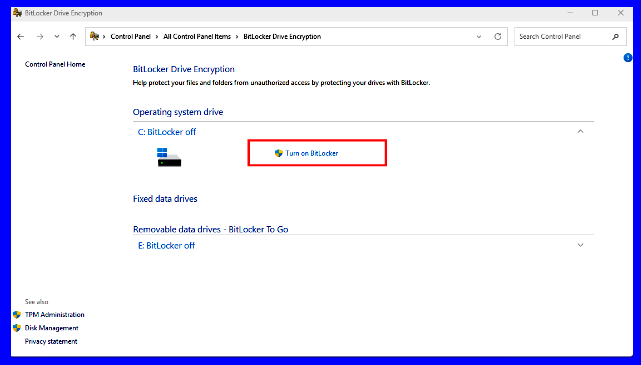
| To open Control Panel, type Control in the Windows Search Box. Click the Control Panel when it appears. From Control Panel → BitLocker, click the setting that says Turn Off BitLocker. |
 |
| In Windows Home, access the toggle to turn encryption on or off from Settings. |
 |
| You will see that the drive is decrypting, and the lock icon is removed. The amount of time this will take depends on the size of the drive and the amount of data stored on the drive. After decryption is completed, the lock icon on the drive will be gone when you view the drive in This PC. |
 |
| Turning BitLocker back on is just as easy, but requires a few more steps. First, click Turn On BitLocker. |
 |
| The first prompt that will appear is where you wish to store the recovery key. I recommend to Save to your Microsoft account. That way, all you will need to access the key would be an Internet connected device. You cannot save it to the PC however, so to Save to a file you need a external drive already attached to the PC. You can Print the recovery key later. |
 |
| You will next be prompted to select whether you want only the part of the disk that currently holds data or do you want to encrypt the entire drive. If you are encrypting a drive that has been in use for a while, it is best to encrypt the entire drive. |
 |
| Since we are discussing the hard drive on a PC, on the third prompt, select New encryption mode. |
 |
| Then your PC will begin encrypting the drive. |
 |
| Whenever BitLocker is turned off and then on again, a new Recovery Key is generated for that drive. Likewise, whenever a clean reinstallation of Windows 11 is performed, a new key is generated then, too. The image below is from the Microsoft website. It is critical to match the Key ID to the key generated on the PC itself. The Key upload date will also help you identify the newer key. |
 |
Few things in modern life are more frustrating than a computer that seems to mock you just for trying to start it up. The purpose of these tutorials is provide a small amount of stress relieving information. As Thomas Hobbs said in Leviathan (1668): "Knowledge Is Power." So, you won't end up like Glory searching the Cosmos for your key. Unlike Glory, BitLocker isn’t evil — but it is unforgiving. Know your key, know your options, and don’t let your PC become your adversary.

Gerald Reiff